
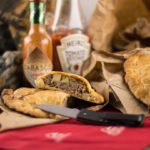
A belyashi, which is featured in Siberian Memories Dacha, Banya & Russian Belyashi-Part Two is the Russian version of the Cornish Pie, which is from which we get the Michigan Pasty, which was featured in our previous post Siberian Memories of a Dacha, Banya & Russian Belyashi – Part One. The difference between the belyashi and the Michigan Pasty are few, with the biggest difference being that the Michigan pasty is baked and the belyashi is fried in fat. The belyashi, as it’s been called in post- Soviet Russia, is thought to have originated from the peremech hand pie which has a hole in the top. After making both the Michigan pasty and the belyashi, my preference is the belyashi when it’s fresh out of the fat or the pasty when they have cooled. You’ll just have to read down to see which one was Chloe’s fav.
View Russian Belyashi Recipe View Michigan Pasty Recipe
The Belyashi Filling

For the belyashi filling we’ll need ground (minced) beef or a blend of pork and beef. Additionally, you’ll need a carrot, yellow onion, oil, mayo, beef stock, garlic powder and fresh (or frozen) dill. To prep for the filling, you’ll need to mince the onions, grate the carrots, as well as fine mince the dill.
Heat the oil in a large fry pan and when the oil glistens add the meat. As the meat cooks break up the large clumps with a wooden spoon. Once the meat is cooking, stir well and sprinkle with the garlic powder, pepper and half of the salt. Stir again. When meat is close to being cooked, add the carrots and onions and continue to cook until the onions are soft, about 10-15 minutes total. Next, remove the belyashi meat filling from the stove and stir in the mayo, dill and stock. Once blended, taste and adjust seasoning as required. Allow the filling to come to room temperature.
The Belyashi Dough
Let’s get our ingredients for the belyashi dough together and mixed so it can rise while the filling is cooling.

You’ll need flour, salt, yeast, oil and warm water. First, sort out your yeast. I used fresh yeast, but dry active or instant yeast will work as well. Next, using a stand or hand mixer, combine your flour and salt (dry). Then pour in your wets (yeast, water and oil). Mix at a low speed until the dough bowl comes clean from the mixing bowl. At this point, I always let the dough set for about 8-10 minutes to let the flour and liquids hydrate. After this, using your dough hook, knead the bread at low speed for an additional 3-5 minutes. If the belyashi dough appears too wet or dry, adjust with flour (for wet) or water (for dry) remix until blended well.

Put your belyashi dough in a large bowl (about 3 time larger than the dough), cover with oiled plastic wrap. Set the bowl in a warm place free of drafts and rowdy kids. I place mine on top of the oven or close by. Let dough rise until it has 2 to 2-1/2 times its original size. This should take about 1 to 1-1/2 hours.
The Belyashi Assembly
 Once the belyashi dough has risen, gently deflate the dough. Next, using a plastic scraper (or spatula) work the dough in the bowl into a roughly shaped ball and roll out on a flour dusted work counter. Now, weigh your dough (if you have a scale) and divide that weight by twenty. That will give you the per piece dough weight. For my cook it was 56 g per piece. This will vary from cook to cook.

On a floured surface, roll the belyashi dough into the shape of a log about 3 to 4 inches in diameter. Using a bread scrapper (I’m holding one in my hand), cut the dough into pieces about 3/4″. If using a scale, weigh the piece of dough and adjust a needed. If not weighing, just mark off twenty equal pieces and cut. Weighing does produce more uniform hand pie. Using your fingers, on a floured surface, stretch out the belyashi dough to form a circle about 3 to 4 inches. I found that hand stretching the dough works best, as it keeps flour off the top of the dough piece. This allows it to seal when squeezed together. Next, place a heaping tablespoon of the cooled cooked meat mixture in the center of the stretched dough. Stretch and fold the dough over and seal the edges by pinching the dough. Now, gently flatten the belyashi in to a round flat shape.
FYI: For my first cook (photographed), I was too stingy with the meat mixture. Make sure you place as much meat mixture as the stretched dough will allow and still fold and seal. That should be a large heaping tablespoon of mixture, but test it on your first belyashi or two. Better to only get 18 nicely stuffed belyashi than 20 that are too doughy.
Frying the Belyashi
For me, it worked best to use a small fry pan (uses less oil) and cook four at a time. While they cooked, I prepared the next four for cooking.

Place enough cooking oil (I used sunflower) to have at least half of the belyashi submerged. Next, heat your cooking oil to 330° F (165°C). Gently place the belyashi, seam side down in the heated oil. Be careful here, we don’t want any burns! Continue to cook until the bottom is golden brown (use tongs to lift, check and turn). Ounce they are brown, again gently turn and cook the other side.
Tip: If possible, use an instant read thermometer to monitor your frying temp. If the oil’s too hot it will brown the dough prior to being completely cooked.

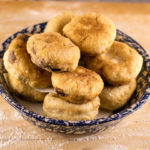
When the belyashi are done, place them on a rack to drain or on paper towels. Serve warm or at room temperature. For food safety’s sake, don’t leave out of refrigeration for more than a couple of hours once cooled.
The belyashi is traditionally served with a garlic dip (Vmochanka). This is simply, warm water (1/4 cup), olive oil (1 tbsp), garlic (large clove, pressed) and a good pinch of salt. Mix well (You can use an immersion blender for an emulsified dip) and dip your belyashi. When I was served belyashi in Siberia, we also had a soured cream and dill dip.
Happy Belyashi Making!

Chloe says, “I’m getting one of these ‘bad boys’ “.
This belyashi recipe has been sneak tasted and tested by Chloe and is approved for dog and human consumption. Chloe has given this recipe her first ever 6-paw rating 🐾🐾🐾🐾🐾🐾, as she liked these better than the Michigan pasty (more meat, less potatoes). However, she wasn’t fond of the garlic dip..
Thanks so much for reading! Which would you prefer, Michigan Pasty or Russian Belyashi? Both recipes are below, please let us know in the comments section just below the recipes which one is our favorite.
Russian Beylishi
A belyashi (or piroshki) is a traditional Russian hand meat pie. Simple to make and a hearty meal or have one as a snack. Prefect for taking into the field for the hunt.
Ingredients
Belyashi Filling
- 2 tbsp (2 msk) olive oil, or fat of choice.
- 2 pounds (.9 kg) Ground (minced) beef or a pork and beef blend, 80% lean.
- 1/2 tsp (2 krm) Salt.
- 1/4 tsp (1 krm) Pepper, fresh ground.
- 1/2 tsp (2 krm) Garlic powder.
- 1 medium Yellow (brown) onion, minced.
- 1 medium Carrot, finely grated.
- 3 tbsp (3 msk) Fresh (or frozen) Dill, finely snipped.
- 2 tbsp (2 msk) Mayonnaise.
- 1/2 cup (1.2 dl) beef stock.
Belyashi Dough
- 1 tbsp (30g fresh) Yeast, instant or active.
- 15 oz (4.43 dl) Water, warmed (body temp).
- 1 1/2 tbsp (1.5 msk) Oil of choice, olive oil works well.
- 4 1/4 cups (10 dl) All purpose flour.
- 1 tsp (1 tsk) Salt, table.
Additional Ingredients
- Sufficient oil of choice to allow the belyashi to be halfway in the oil.
- Additional flour for dusting and working dough.
Vmochanka or Garlic Dip
- 1 large glarlic clove, pressed.
- 1/2 tsp (2 krm) Salt, table.
- 1 tbsp (1 msk) Olive oil, extra virgin if possible.
- 1/2 cup (1.2 dl) warm water.
Instructions
The Belyashi Filling
-
Heat the oil in a large fry pan and when the oil glistens add the meat. As the meat cooks break up the large clumps with a wooden spoon.
-
Once the meat is cooking, stir well and sprinkle with the garlic powder, pepper and half of the salt. Stir again.
-
When meat is close to being cooked add the carrots and onions and continue to cook until the onions are soft. About 10-15 minutes total.
-
Now, remove the belyashi meat filling from the stove and stir in the mayo, dill and stock. Once blended, taste and adjust seasoning as required.
-
Set aside for use later and allow the filling to come to room temperature.
The Belyashi Dough
-
Dissolve your fresh yeast in half the warm water or if using active yeast, it should be proofed per manufactures recommendations. If using instant yeast, add to you flour and salt.
-
Mix your drys, flour, salt and instant yeast if using in the mixing bowl.
-
Combine your wets, yeast (not instant), water and oil.
-
Next, using a stand or hand mixer with bread hook, combine your drys (flour and salt) and your wets (yeast, water and oil). Mix at a low speed until the dough bowl comes clean from the mixing bowl. (see note 1)
-
After pausing, knead the bread at low speed for an additional 3-5 minutes. If the belyashi dough appears too wet or dry, adjust with flour (for wet) or water (for dry) remix until blended well.
-
Put your belyashi dough in a large bowl (about 3 time larger than the dough), cover with oiled plastic wrap. Set the bowl in a warm place free of drafts and rowdy kids. I place mine on top of the oven or close by. Let dough rise until it has 2 to 2-1/2 times it’s original size. This should take about 1 to 1-1/2 hours.
The Belyashi Assembly
-
Once the belyashi dough has risen, gently deflate the dough. Next, using a plastic scraper (or spatula) work the dough in the bowl into a roughly shaped ball and roll out on a flour dusted work counter. (see note 2)
-
On a floured surface, roll the belyashi dough into the shape of a log about 3 to 4 inches in diameter. Using a bread scrapper, cut the dough into pieces about 3/4″. If using a scale (see note 2), weigh the piece of dough and adjust a needed. If not weighing, just mark off twenty equal pieces and cut. Weighing does produce more uniform hand pie.
-
Using your fingers, on a floured surface, stretch out the belyashi dough to form a circle about 3 to 4 inches roughly the same thickness. (see note 3)
-
Next, place a heaping tablespoon of the cooled Belyashi filling in the center of the stretched dough. Stretch and fold the dough over and seal the edges by pinching the dough.
-
Now, gently flatten the belyashi in to a round flat shape.
Frying the Belyashi
-
Place enough cooking oil (I used sunflower) so as to have at least half of the belyashi submerged. Next, heat your cooking oil to 330° F (165°C).
-
Gently place the belyashi, seam side down in the heated oil. Be careful here, we don’t want any burns! (see note 4)
-
Continue to cook until the bottom is golden brown (use tongs to lift, check and turn). Ounce they are brown, again gently turn and cook the other side.
-
When the belyashi are done, place them on a rack to drain or on paper towels.
-
Serve warm or at room temperature. For food safety's sake, don’t leave out of refrigeration for more than a couple of hours once cooled.
Garlic Dip
-
The belyashi is traditionally served with a garlic dip (Vmochanka). Mix all ingredients well and and serve.
-
You can use an immersion blender for a really emulsified dip.
Recipe Notes
Please note that the quantities can be changed by entering the amount you wish in the quantity indicator. However, the metric will not change.
- At this point, I always let the dough set for about 8-10 minutes to let the flour and liquids hydrate.
- If using weight to measure size of pieces, weigh your dough and divide that weight by twenty. That will give you the per piece dough weight.
- I found that hand stretching the dough works best, as it keeps flour off the top of the dough piece. This allows it to seal when squeezed together.
- For me, it worked best to use a small fry pan (uses less oil) and cook four at a time. While they cooked, I prepared the next four for cooking.
Michigan Pasty Recipe
Madelyne Lawry's Pasty Recipe
My Swedish adaptation of the authentic Michigan Yooper Pasty, based on the recipe from Madelyne Lawry. The Lawry family have been feeding Pasties to folks in the upper and lower peninsula of Michigan (USA) since 1946. A Pasty is a wonderfully tasty baked hand meat pie.
Ingredients
The Crust
- 2 cups (4.75 dl) Flour.
- 2/3 cups (1.66 dl) Crisco, lard or margarine (Milda in Sweden), see note 1.
- 1/2 tsp (1/2 tsk) Salt.
- 1/2 cup (1.25 dl) Cold water.
The Filling
- 12 ounces (340 g) Ground (minced) beef. See note 2.
- 1/2 cup (1.25) Onion, finely chopped.
- 1/2 cup (1.25 dl) Rutabaga or Swede (kålrot), grated.
- 3 cups (7 dl) Waxy potatoes, such as Yukon Gold, Yellow or red. Diced about 1/4" (6mm)
- Salt and Pepper, to taste.
- 2 tbsp (2 msk) Dried Parsley, or 1/3 cup (3/4 dl) fresh minced.
- 1/2 cup (1.25 dl) Milk, for use in assembling the Pasty.
Condiments
- Ketchup.
- Hot sauce of choice.
Instructions
The Crust Dough
-
The crust dough is a supper simple dough to make and can be mixed in a stand mixer, hand mixer or by hand. It will be a wet and somewhat sticky. (See Note 3)
-
Mix the flour and salt in your mixing bowl. Next, cut in your Crisco, lard or Milda into the flour mixture.. This can also be done by your mixing blades. Just add pieces of your fat of choice slowly.
-
Once the Crisco, lard or margarine is thoroughly cut into the flour the dough is ready to mix. Add the cold water and mix until you have an elastic dough.
-
Now, the dough must be kneaded, yes kneaded. You can do this by hand on a well-floured board or using your electric mixer. If using an electric mixer, use the dough kneading hook (hooks). Continue kneading until you have an nice soft dough. Be careful to not use too much flour if hand kneading.
-
Divide the dough into four equal sized balls (see note 4) and refrigerate for at least an hour.
The Pasty Filling
-
Begin by preheating Oven to 400°F (205°C) or gas mark 6 for my mates in the UK.
-
After the dough has chilled for an hour, your ready to toss together the filling. In a large bowl, break the meat into small pieces. Then, add the rest of the filling ingredients (except salt and pepper) and toughly mix. (See note 5).
-
Next take you four balls of chilled dough and roll them into a circle a circle about 8' (20 cm) in diameter.
-
Now, using a pastry brush, brush milk around the rolled out dough's edge (about an half inch in). This will ensure a good seal.
-
Place 1/4 of the filling mixture (about a cup) in the center of each piece of rolled out dough.
-
Now, rollover the dough making a half moon and seal all of the edges with a fork. You can also use a pinch seal instead of the fork sealing method.
-
Place the pasties on a parchment paper lined oven pan and cut two vertical slits about a 1/2" each in each pasty.
-
Brush the top of the pasties with milk and bake for 25 minutes on the bottom shelf. After the first 25 minutes take out the sheet and rotate 180 degrees, replacing it in the middle shelf of the oven. During the last 10 minutes watch that the crust isn't getting too brown. Cover with aluminum foil in needed.
-
When the pasties are done, remove them and cool for at least 10 minutes, then serve. Pasties are traditionally served with ketchup and hot sauce, but use whatever rocks your clock.
Recipe Notes
Please note that the quantities can be changed by entering the amount you wish in the quantity indicator. However, the metric will not change.
- If using Crisco, you might like to use the butter flavored one to give the pie crust a bit more flavor.
- For your meat choice, 80% lean ground (minced) meat is best. You can also use a pork/beef blend (blandfärs). You may also substitute 1/2" pieces of beef steak, along with 1/2 cup of grated edible suet for the ground meat.
- Instead of making the crust dough you can use store bought puff pastry. However, it doesn’t give the same texture as when using the fresh dough for the Pasties.
- For making equally divided dough, I use my kitchen scale. Weight the entire piece of dough. Divide that weight by your quantity, then weigh out the pieces. As an example, if your dough weighs 567 grams (1.25 lbs) and you need four pieces, you'll need each piece of dough to weigh 141 grams or 5 ounces each.
- After mixing the filling ingredients, take a heaping teaspoon of the mixture and either pan fry it or microwave it. Then taste for seasoning and adjust as needed. Alternately, use a 1/2 teaspoon of salt and pepper when mixing.
That belyashi sounds like it would be pretty good to me. I enjoy other types of meat pies, so I could see that being pretty tasty as well. Next time I am feeling like trying something new, I might have to try this, or some other Russian foods out.
Thanks, I think you’ll like them…
With the understanding that this was posted well before Russia’s unprovoked full-scale invasion of Ukraine, as well as with all due respect, belyashi are Ukrainian. They’re different from Russian piroshki and if you dig into this, you can find the differences explained. Ukrainians tend to explain it better. Sergei Sputnikov mentions it in a video on his channel, Ushanka show, and explanations come up on Google…